Hi there! What you are reading right now is the first blog for the “Markdown Streaming Parser” series. Here, I will be penning down my learnings from building a markdown parser from scratch in Typescript. The key constraints: no dependencies. yes. NO FRICKIN DEPENDENCIES.
Obviously, it has to be “blazingly” fast as we. Who likes slow stuff? With these constraints in mind, let’s start with the blog.
Table of Contents
Open Table of Contents
Preface
Have you ever wondered, when you ask some “programming” related question, how come ChatGPT renders it beautifully in a markdown format where you can just copy it, see the styles applied?

Some of you have already have an answer, it’s a client-side package which converts “markdown” to “html”.
There are already plenty of library that converts markdown to html, but it’s really tricky when your markdown data is streaming.
Unlike standard parsing, where you have the entire data available at runtime, here the data you are parsing is coming as streams of data, which becomes a little tricky to handle. How do you handle that? Above all, how do you even build a parser from scratch? After building, how can I integrate it on my web app? I have all these questions, and the answers might take a little while :)
Here’s what we’ll cover:
- Why am I even doing this?
- How am I doing this?
- WTF is a “State Machine”?
- Talk is cheap, show me code.
I am trying my best to answer the above questions in this blog. So, if you are remotely interested in “State machines”, “parsers” or just bored, I hope this blog gives you some insights to them.
Design
I want to start by building a simple markdown parser. What do I mean?
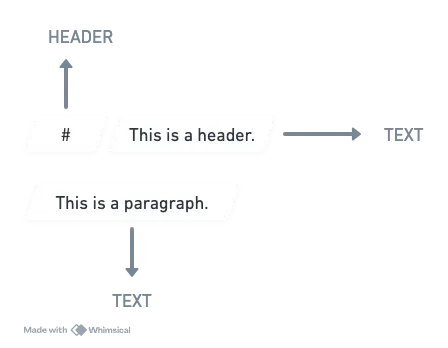
For given input:
# Hello, World
This is a paragraph.
I wish to generate output like this:
<h1>Hello, World</h1>
<p>This is a paragraph.</p>
Why in this manner? Because, if I can generate appropriate html tags, I should be able to render it on the client. It’s that simple.
In a high level, it should look like the below image.

Let’s pause for a while and think this through.
Have:
Input markdown data. This data can be really large as well.
Want:
Output HTML formatting for the markdown data.
Constraints:
We cannot use any external dependencies. That means we have to write everything from scratch. We want to make sure its performant as well.
So, let’s start by reading and processing the data. You can read the data line by line and process it using regex, or use a generator. You can find plenty of such ways. This may vary depending on your choice of language, specific use case, input size and performance requirements.
For our parser, since we wish to use it for a web application on client side, it would be ideal if we can build a “npm” package and import it to build the client.
There is a “cool” node.js built in “Transform stream” which gives us this functionality to expand on.
What is a “Transform Stream”?
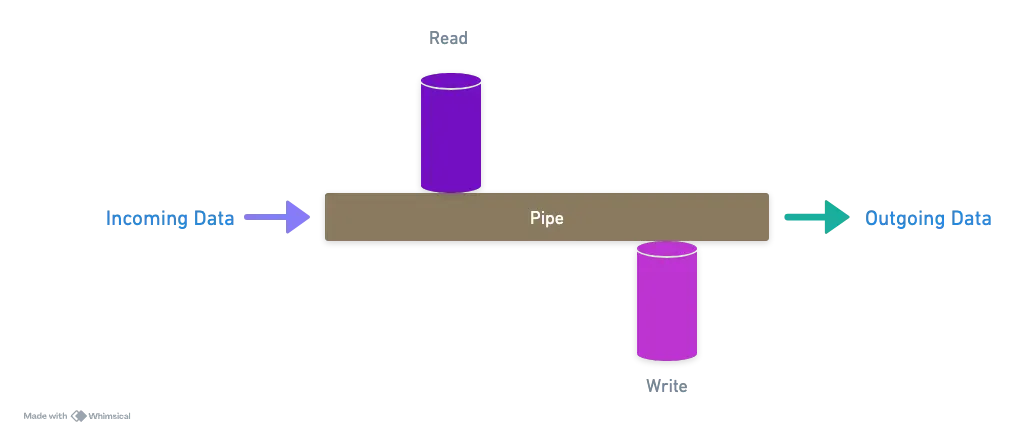
It’s a duplex stream that can both read and write data. Imagine a pipe where water is flowing. You can drink from the pipe and at the same time add more water to the pipe. That is a duplex stream.
My favorite explanation: Think of it like a coffee filter that not only filters your coffee but can also add flavoring as the liquid pass through.
In technical terms, transform streams are a type of duplex stream where the output is computed based on the input. They implement both Readable and Writeable interfaces.

Key characteristics of Transform streams:
- They have separate internal buffers for both reading and writing.
- They allow for data transformations as it passes through the stream.
- They can be used for tasks like parsing, encoding, or compressing the data on-the-fly.
Seems like a good pick for our use-case.
Now, since we can read data using a transform stream, it’s time to process the data. For that we need to process input stream character by character.
Let’s recap on different types of characters in Markdown.
- TEXT: This can be your simple text.
- HEADER: This starts with “#” and makes the text appear as header.
- CODE_BLOCKS: Anything that starts and ends with this ”```” will appear as a code block.
- EMPHASIS: Text inside “*” will appear bold or emphasis.
and many more…
So, we need a way to map the characters to their corresponding “type” in markdown. This process is called “Tokenization”.
What is Tokenization?
Tokenization is the process of breaking down a piece of text or data into smaller units called tokens. Think of it as chopping up a sentence into individual words or meaningful pieces. It’s usually the first step in parsing. Once we have our tokens, we can then analyse them to understand the structure and meaning of the text.
The main advantage of tokenization is that it simplifies the subsequent processing steps. Instead of dealing with long string of characters, we will be working with meaningful chunks that will be easier to transform.

Now that we understand what “Tokenization” is, let’s see how we can break an existing string into streams of tokens and then identify it.
Let’s start by defining our tokens.
export enum TokenType {
  TEXT,
  HEADER,
  CODE_BLOCK,
  EMPHASIS,
  UNKNOWN
}

export enum Token {
  type: TokenType,
  content: string
}
For now, we will just go with four simple tokens: text, header, code blocks, emphasis. Later we can extend to different markdown styles. I have added “UNKNOWN” to handle tokens that are not recognizable or that cannot be parsed from our parser. We can also use it to handle “error” or “unrecognized markdown” format.
Now, let’s write the main “tokenizer” methods which takes an “input” string and converts it to multiple “tokens” so that we can further process it.
export class Tokenizer {
  private buffer: string;
  private position: number;
  private state: TokenizerState;

  constructor() {
    this.buffer = "";
    this.position = 0;
    this.state = TokenizerState.TEXT;
  }
// There's still more code here, so hold your horses.
}

enum TokenizerState {
  TEXT,
  HEADER,
  CODE_BLOCK,
  EMPHASIS
}
The “Tokenizer” class is kind of a boilerplate code for people who build parsers. To put it simply:
- You need a “buffer” to make sure you are processing the current line.
- You need a “position” index so that you know at what position you are currently at.
I have created a TokenizerState which I will “match” and handle the each “TokenType” separately.
So, we will pick one line, put it in buffer, start the processing by moving the position index, and at each index we will match the TokenizerState and handle them accordingly. That’s the plan.
Wait a minute? Where is “state machine”, the title of the blog? Well, the above two lines summarizes the “state machine” in simplicity. Regardless, let’s see what it is in more simple terms.
What is State Machine?
Think of state machine like a really picky robot that can only be in one mood at a time. Let’s break this down with something we all know - a traffic light.
A traffic light is a perfect example of state machine. It can only be in one state at a time (Red, Yellow, or Green), and it follows strict rules about how it can change from one state to another. Have you ever seen it directly jump from Red -> Green? No.
In our markdown parser, we’re using the same concept. Our parser is like a tiny robot reading text and at any point it can be in one of the state:
- Reading regular text (TEXT state).
- Reading a header (HEADER state).
- Reading a code block (CODE_BLOCK state).
- Reading emphasis text (EMPHASIS state).
And how does the state changes?
 TEXT state
  ↓ (sees '#')
HEADER state
  ↓ (sees newline)
TEXT state
  ↓ (sees '```')
CODE_BLOCK state
  ↓ (sees '```')
TEXT state
The beauty of using a state machine is that it makes our parser’s job much easier. At any moment, we only need to worry about two things:
- What “state” are we in right now?
- What “character” did we just read?
This super simple design turns our complex problem into a seris of “if this, then that” decisions.
Let’s create a tokenize method in the tokenizer class and see how we implement our state machine.
tokenize(input: string, isEnd: boolean): Token[] {
  // Add the current input chunk to the buffer to process.
  this.buffer += input;
  let isStartOfToken = true;

  // We will store the processed tokens here.
  const tokens: Token[] = [];

  // See this is how we will traverse linearly using the position pointer.
  while(this.position < this.buffer.length) {

   // Get the character at the current position.
   const char = this.buffer[this.position];

   // "match" the current character against possible "tokenizer states" to
   // determine the token type.
   switch (this.state) {

    case TokenizerState.TEXT:
     if (isStartOfToken && (char === '\n' || char === ' ')) {
      this.position++;
      isStartOfToken = false;
     } else if (char === '#') {
      if (this.position > 0) tokens.push(this.createToken(TokenType.TEXT));
      this.state = TokenizerState.HEADER;
      isStartOfToken = true;
     } else if ( char === '`' && this.peek(2) === '``') {
      if ( this.position > 0) tokens.push(this.createToken(TokenType.TEXT));
      this.state = TokenizerState.CODE_BLOCK;
      this.position += 2;
      isStartOfToken = true;
     } else if (char === '*' || char === '_' ) {
      if (this.position > 0) tokens.push(this.createToken(TokenType.TEXT));
      this.state = TokenizerState.EMPHASIS;
      isStartOfToken = true;
     } else {
      // UNKNOWN.
      this.position++;
      isStartOfToken = false;
     }
     break;

    case TokenizerState.HEADER:
     // When in header state, continue till you reach the end of the new line or end of the buffer.
     if (char === '\n' || this.position === this.buffer.length - 1) {
      // this.position++; // Increment position to consume the newline.
      tokens.push(this.createToken(TokenType.HEADER));
      this.state = TokenizerState.TEXT;
      isStartOfToken = true; // Reset isStartOfToken when transitioning back to TEXT.

     } else {
      this.position++;
     }
     break;

    case TokenizerState.CODE_BLOCK:
     // When in code block state, continue till you reach the next '```'.
     if (char === '`' && this.peek(2) === '``') {
      this.position += 3;
      tokens.push(this.createToken(TokenType.CODE_BLOCK));
      this.state = TokenizerState.TEXT;
      isStartOfToken = true;
     } else {
      this.position++;
     }
     break;

    case TokenizerState.EMPHASIS:
     // This emphasisChar can be either "*" or "_"
     const emphasisChar = this.buffer[this.position - 1];
     if (char === emphasisChar || this.position === this.buffer.length - 1) {
      this.position++;
      tokens.push(this.createToken(TokenType.EMPHASIS));
      this.state = TokenizerState.TEXT;
      isStartOfToken = true;
     } else {
      this.position++;
     }
     break;
   }
  }

  if (isEnd && this.position > 0) {
   tokens.push(this.createToken(this.state === TokenizerState.TEXT ? TokenType.TEXT : TokenType.UNKNOWN ));
  }

  return tokens;
 }
The rest of the code is pretty straightforward. We process each of them based on their state and then create tokens corresponding to them. Once processed, we just increment the position pointer to process the next character.
To support this, we create some standard helper functions.
- createToken: This helps us by creating a “token”.
- peek: This helps us take a look at few positions ahead. Super common in all parsers and really handy to handle tokens that have multiple characters for example ``` where there are three backticks.
Now, our tokenizer can take input string and process them into multiple tokens. And, we know that transform will allow us to read and write the data in streams. Let’s use this block to start building our Markdown Streaming Parser.
export class MarkdownStreamParser extends Transform {
  private buffer: string;
  private tokenizer: Tokenizer;

  constructor(options?: TransformOptions) {
    super(options);
    this.tokenizer = new Tokenizer();
    this.buffer = "";
  }

  // `Transform` gives us the _transform method to process the chunks.
  _transform(chunk: any, encoding: BufferEncoding, callback: TransformCallback): void {
    // add chunk to buffer.
    this.buffer += chunk.toString();
    this.processBuffer();
    callback();
  }

 // This is to process the remaining buffer.
 _flush(callback: TransformCallback): void {
  this.processBuffer(true);
  callback();
 }

 // This process method invokes the tokenize function.
 private processBuffer(isEnd: boolean = false): void {
   const tokens = this.tokenizer.tokenize(this.buffer, isEnd);
   tokens.forEach(token => this.push(JSON.stringify(token) + '\n'));
   this.buffer = this.tokenizer.getRemainingBuffer();
 }
}
With this, we should be able to process the streams and convert them into tokens.
Testing
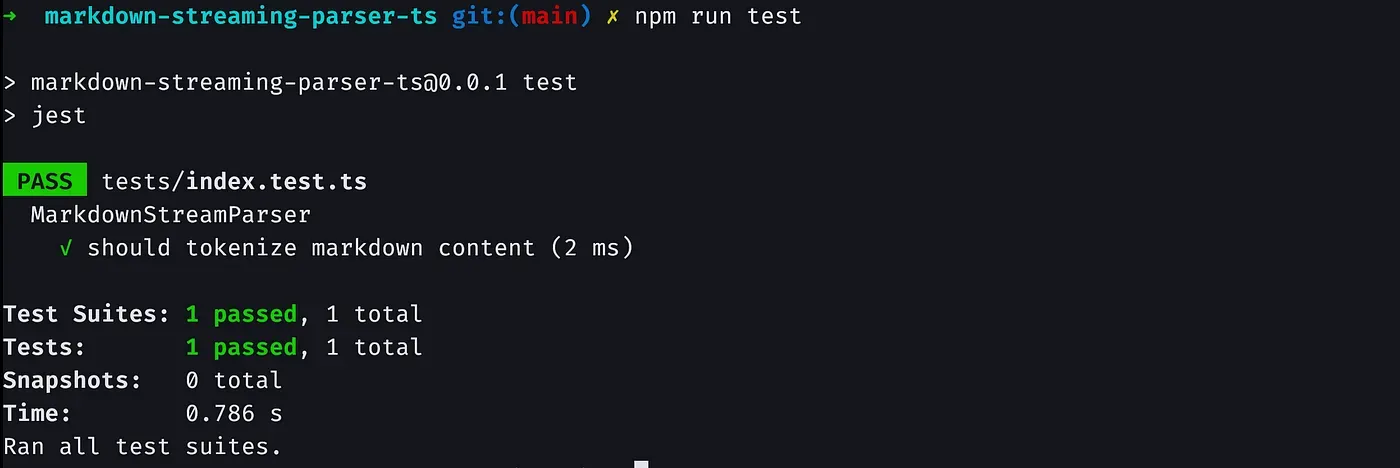
Let’s test it out. We can quickly write a test to run using jest.
PS: For those who are not aware about jest, its a simple javascript/typescript
testing framework. Read more about it here: https://jestjs.io/
describe('MarkdownStreamParser', () => {
 it('should tokenize markdown content', (done) => {
  const input = '# Hello\nWorld!\n```code```\n*emphasis*';

  // Returns an array of tokens after tokenizer.
  const expected = [
   { type: TokenType.HEADER, content: '# Hello' },
   { type: TokenType.TEXT, content: '\nWorld!\n' },
   { type: TokenType.CODE_BLOCK, content: '```code```' },
   { type: TokenType.TEXT, content: '\n' },
   { type: TokenType.EMPHASIS, content: '*emphasis*' },
  ];

  const readable = new Readable();
  readable._read = () => { };
  readable.push(input);
  readable.push(null); // Mark the end of the stream.

  const parser = new MarkdownStreamParser();
  let result: Token[] = [];

  readable.pipe(parser)
   .on('data', (chunk) => {
    result.push(JSON.parse(chunk));
   })
   .on('end', () => {
    expect(result).toEqual(expected);
    done();
   });
 });
});

Awesome, the expected tokens match with the actual tokens.
As of now, our parser can take an input string and convert them into tokens and identify the token types. This is a good first step in building our parser.
We will continue to build our parser incrementally. Stay tuned for the second blog.
You can access the code here: https://github.com/swaingotnochill/markdown-streaming-parser-ts
Please drop a ⭐️ in the github repository if you like the blog or the project.
Tschüss.